Today involved a whole lot of sanding, filling, and fabrication of the neat little details on Flashy.
I didn't take any progress photos, but I'll talk about what I did. First, I took some wood filler and filled in a lot of the gaps and crevasses in the gun. The trapezoid and the back where the flat "slide" meets the cylindrical barrel were filled and smoothed out as best the paste would allow. When it dries, I should be able to sand it nice and smooth.
I took a 1/2" poplar dowel and bisected it, with these I glued them to the slide just above the trapezoid. I then took another section of the Poplar dowel, cut and sanded 4 grooves into it, and made the front and back...I'm not sure what they are in the gun...maybe a laser sight mount? Anyway, that stick-thing coming out of the trapezoid.
The quarter circles in the grooves above the trigger were quarters of a simple 1" wooden toy wheel blank, cut into fourths. I took another complete wheel and set them in the trapezoid, along with two short, thin strips of sintra.
For the back of the gun, I cut off the end of a rubber cap that you'd find on the end of a cane or walker and smoothed it out for the "butt-cap". I used plumbers two-part epoxy putty and made a sloping ridge from the wider part of the barrel to the gun barrel. Once this dries, I'll take a dremmel and smooth it out to make a nice sharp 45-degree angle. Finally, I placed a wooden cap in each of the carved recesses in the grip.
The last little detail I needed to figure out were the two "switches" on the back, in-line with the half-dowels. I knew I'd seen something like them before, but it didn't dawn on me what they were until I was carving away the rubber cap for the end of the gun.
They're the locking switch from a snap-blade box-cutter. Tomorrow, I make a trip to the dollar store, buy two, and cannibalize them to make the last switches.
There are some details that I just didn't do, and I'm not sure I'll get to them. There's the oblong recess under the barrel by the trigger, and some details in the front of the trapezoid. These I may just leave off. This is "Flashy Mk I", and if there's a Flashy Mk II I'll try to incorporate those then.
All and all, she doesn't look too bad. And she feels great in the hand.
Really looking forward to finishing this master up, so I can see how I do with molding and casting.
Saturday, May 5, 2012
Monday, April 30, 2012
Flashy: Phase Three-Flash and Function
A little more work tonight, a little bit further.
First thing I worked on today was filling in the gaps in the recessed section of the trapezoid and in the indents along the barrel. I used cut-outs from a very thin sintra sign, trimmed and fir them to place, and hot-glued them where they needed to be.
Next part is placing the end cap on Flashy. Eventually I'll be layering on some bondo and smoothing out a sloping cone from the barrel to the width of the endcap, but first I need to make the end cap. I cut little lengths of sintra and glued them around the inside of the pipe. I glued on this black end-cap pipe that came with a set of shelves I had, and it made a perfect seat for the end cap, the cap to an old pill bottle. The pill bottle cap actually works out well, because Flashy has all these indents at almost the exact spacing and shape as the pill bottle cap.
Finally, I made the "clip" out of another piece of thicker sintra. Trimmed it down to the right shape, glued it into place at the butt end of the grip, and it's good to go.
This thing is really starting to come together.
Time to make the trigger. After dremmeling out a recess in the frame for the trigger, I cut the basic shape of the trigger out of sintra.
The trigger fits well, and looks pretty good. I may afix the trigger into place, or I may mold it as a separate piece. I'm not sure at this point.
The next task will be the tricky one; I'll be taking a stab at Bondo. I need to create the bevel from the barrel width to the end-cap width, and fill in the trapezoid a bit. After that it's all about finding a few detail pieces, and hopefully getting it ready to resin cast.
First thing I worked on today was filling in the gaps in the recessed section of the trapezoid and in the indents along the barrel. I used cut-outs from a very thin sintra sign, trimmed and fir them to place, and hot-glued them where they needed to be.
Next part is placing the end cap on Flashy. Eventually I'll be layering on some bondo and smoothing out a sloping cone from the barrel to the width of the endcap, but first I need to make the end cap. I cut little lengths of sintra and glued them around the inside of the pipe. I glued on this black end-cap pipe that came with a set of shelves I had, and it made a perfect seat for the end cap, the cap to an old pill bottle. The pill bottle cap actually works out well, because Flashy has all these indents at almost the exact spacing and shape as the pill bottle cap.
I also cut some details into the trapezoid, the little "keyhole" marks.
Finally, I made the "clip" out of another piece of thicker sintra. Trimmed it down to the right shape, glued it into place at the butt end of the grip, and it's good to go.
This thing is really starting to come together.
Time to make the trigger. After dremmeling out a recess in the frame for the trigger, I cut the basic shape of the trigger out of sintra.
The trigger fits well, and looks pretty good. I may afix the trigger into place, or I may mold it as a separate piece. I'm not sure at this point.
Things are definitely starting to come together for Flashy. I really like the look and the feel of the pistol.
The next task will be the tricky one; I'll be taking a stab at Bondo. I need to create the bevel from the barrel width to the end-cap width, and fill in the trapezoid a bit. After that it's all about finding a few detail pieces, and hopefully getting it ready to resin cast.
Malgus Notes
For those of you playing the home game; no, I have not discarded my desire to do Darth Malgus. In fact with a few recent aquisitions and some notes online, I'm re-doubling my efforts to progress towards obtaining my "Sith Lord" designation in the 501st.
Just putting a few links down here for future reference for this project...
Pepakura Notes and Tutorials
Fierfek's Pepakura Files - Has Some Malgus Stuff
EVA Foam -> Rotocast Finish
This could be...interesting.
Just putting a few links down here for future reference for this project...
Pepakura Notes and Tutorials
Fierfek's Pepakura Files - Has Some Malgus Stuff
EVA Foam -> Rotocast Finish
This could be...interesting.
Flashy: Phase Two-Barrels of Fun and the Sin of Tra
I made a little more progress on Flashy over the weekend. I'm really enjoying how the pistol is coming along. If there's one complaint that I have, it's that I think I'm shooting myself in the foot for being able to wire up some electronics in this thing. Ideally, I'd like to have an LED light be inside the trapezoidial housing under the front of the barrel. My problem is I don't think I'm making the gun quite right to do that.
Not much can be done about it at this step. I guess I'll just press on and see where things go. This is my first run at the subject, and my first prop ever of this type. I need to remember that it doesn't have to have all the bells and whistles on the first try. I need to get some experience with this stuff, and then I can move on to more advanced concepts like "electronics".
Anyway, on with the progress report...
Next up, the barrel! I'm using a 1.25" pvc pipe for the barrel, cut to about 11" long. I need it to have a slot in the bottom, running about 9" long, to slide over Flashy's basic frame. This was done with a dremmel and a quik-lock plastic-cutting wheel.
This led to the next step, modifying the frame to be able to accept the barrel where I want it to rest. As you can see, the barrel is way out too far.
As I mentioned in my last post, I probably jumped the gun a bit by glueing one of the halves of the pistol grips in place. I needed to cut out a large amount of the frame to fit the barrel.
Fortunately I was still able to do so, with one side of the frame still flush witht he base of the Scrollsaw. Three quick line-cuts, and the frame can accept Flashy's barrel.
Decent hand-size, if I do say so myself.
The barrel needed a few modifications' there are indents on the left and right of the barrel that needed to get marked off and cut out.
Looking better...looking better...
Now we move on to "the Trapezoid". The trapezoid starts out narrow at the bottom, and goes up the gun at a slope to be as wide as the barrel. I marked off and cut the two sides out of Sintra sheets.
I then marked off and cut out the indentations on the sides of the trapezoid.
Looking decent! But...I discovered another problem. The trapesoids have indentations that are flush with the frame. The barrel will need to have more voids cut out of them to allow for the indentations.
Next step is the top of the barrel. There are 5 flat polygons that make up the encosure around the barrel, other than the sides of the trapezoid. I measured them off and cut them out.
One quick application of hot glue and they're in their basic position.
A little more glue, and the trapezoid is in place.
I really like how this thing is coming along. It's not going to be perfect when it's done, but I think it is going to be pretty.
Next think is to finish the sides of the trapezoid and get the end-cap in place.
Then it's on to unraveling the mysteries of "Bondo"...
Thursday, April 26, 2012
Flashy: Phase One-Basic Shapes and Pistol Grips
So today I had the desire to get working on Flashy.
I copied the concept drawing I did and laid it out on 1/2" MDF board. Taping it down and tracing over it with pencil, I got the basic body of the gun laid out.
Next step was to fire up the scrollsaw and cut out the basic body of the gun.
That leaves us with the basic shape. From here, the gun will start to take form.
Next part I wanted to work on was the pistol grips. Taking a page from Volpin's ME3 Rifle build, I cut the grips out of 1/4" MDF, stacked them on top of each other, and taped them together. Cutting them out together gave me two identical grips, one for each side.
I sanded them down, rounding out the edges, and glued one of the grips into place.
I may have jumped the gun on that one, as I may need to trim the body some more when I get to making the barrel, so I won't glue on the second grip until later.
One night of work. Progress.
I copied the concept drawing I did and laid it out on 1/2" MDF board. Taping it down and tracing over it with pencil, I got the basic body of the gun laid out.
Next step was to fire up the scrollsaw and cut out the basic body of the gun.
That leaves us with the basic shape. From here, the gun will start to take form.
Next part I wanted to work on was the pistol grips. Taking a page from Volpin's ME3 Rifle build, I cut the grips out of 1/4" MDF, stacked them on top of each other, and taped them together. Cutting them out together gave me two identical grips, one for each side.
I sanded them down, rounding out the edges, and glued one of the grips into place.
I may have jumped the gun on that one, as I may need to trim the body some more when I get to making the barrel, so I won't glue on the second grip until later.
One night of work. Progress.
Thursday, April 12, 2012
Flashy Build: Conceptual Artwork
In my opinion, a great final product starts with a plan.
The gun has a few angles, but I don't think they're too drastic that they can't be worked with.
I didn't draw the scope on the side view, it's something I'll probably do on it's own.
Now I just need to dissect the shapes and figure out how to make the component parts. I'm thinking of 1/2" MDF for the basic shape of the gun. The center barrel will be a 1.5" PVC pipe, with a 2" end cap piece. I'll need to find a good funnel to cut up and make the bridge between the two diameters of pipe.
I could leave the Trapezoid-box hollow, and run electronics through it. There are LED lights on the side and the front, including the smaller "barrel", that are all the same color of the crystal loaded in the gun.
Plot and plan. Plot and Plan.
Tuesday, April 10, 2012
Flashy Things are the Best
So I think it's time I start to figure out this whole "prop making" thing. Lord knows I'm surrounded by enough of a creative community.
I think it's best if I start small-ish. The last time I had the idea to do this, it was to make a Clone Trooper long rifle (DC-15A for those in the know) for use on a vaccuform table. That's a 54" long weapon, to be molded in 3 segments, 2 halves each. I don't know what I was thinking that day.
The next was to try to make the Laser Pistol from Fallout 3, and that was just overly complex.
I want to try to make a gun, one that can be resin cast and duplicated. Possibly with space in it for having LEDs and maybe sounds.
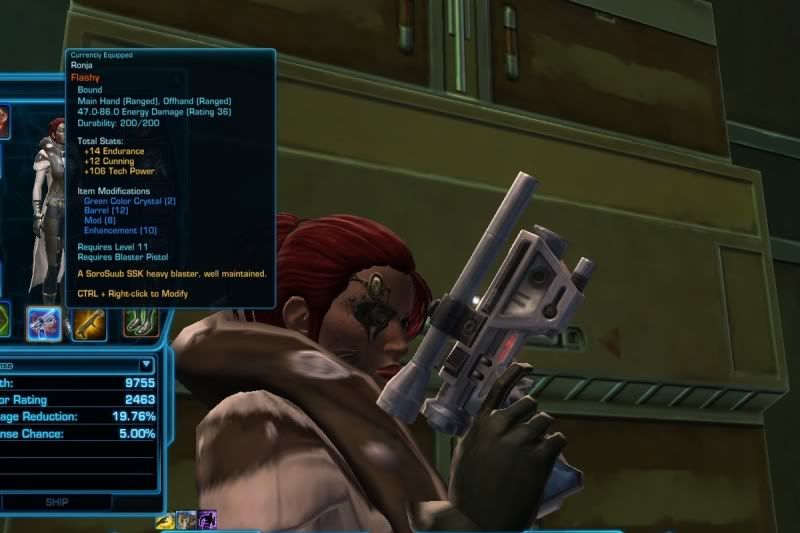
I keep seeing one certain blaster in Star Wars The Old Republic. Known by many names, the one it may be best known as is "Flashy". It's a pistol given to the Smuggler by Corso Riggs at the end of the Ord Mantel story arc.
I like the look of it, it's simple yet interesting, and it actually can be further modded out. I've seen models with longer barrels on it, although I can't find an image of it online.
So here's what I'm going to try. the plan is to make a master out of wood and then pour a resin mold around it.
Just getting some images here to act as a reference for wherever I start to work on it.
Probably going to have to mold the scope separately.
So yeah, something to work on in my copious amounts of free time.
Right along side my Rifts Conversion, my Podcasts, my campaigns, finishing my Jedi Shadow, trying not to start my Jedi Knight, and packing my damn house up for a summertime move.
I'm such a smart kid.
I think it's best if I start small-ish. The last time I had the idea to do this, it was to make a Clone Trooper long rifle (DC-15A for those in the know) for use on a vaccuform table. That's a 54" long weapon, to be molded in 3 segments, 2 halves each. I don't know what I was thinking that day.
The next was to try to make the Laser Pistol from Fallout 3, and that was just overly complex.
I want to try to make a gun, one that can be resin cast and duplicated. Possibly with space in it for having LEDs and maybe sounds.
I keep seeing one certain blaster in Star Wars The Old Republic. Known by many names, the one it may be best known as is "Flashy". It's a pistol given to the Smuggler by Corso Riggs at the end of the Ord Mantel story arc.
I like the look of it, it's simple yet interesting, and it actually can be further modded out. I've seen models with longer barrels on it, although I can't find an image of it online.
So here's what I'm going to try. the plan is to make a master out of wood and then pour a resin mold around it.
Just getting some images here to act as a reference for wherever I start to work on it.
Probably going to have to mold the scope separately.
So yeah, something to work on in my copious amounts of free time.
Right along side my Rifts Conversion, my Podcasts, my campaigns, finishing my Jedi Shadow, trying not to start my Jedi Knight, and packing my damn house up for a summertime move.
I'm such a smart kid.
Subscribe to:
Posts (Atom)